Istaknuti post

PASSAT B6 MIRROR DOWN-

nedjelja, 15. listopada 2017.

PASSAT B6 MIRROR DOWN-

Mirror down without memory seats

Parts needed

1. 1x Memory Mirror Motor - P/N 3D0 959 578 C -> MUST BE C VERSION

2. 1x 8 Pin connector for new memory motor - This connector is not available for sale from VW . What people to do is buy some 12 - 16 pin connector and "shave" it down to 8 pin connector with rotary tool. Here are some examples of connectors that can be "shaved" down:

8E0 972 112 A - YOU ONLY USE AND "SHAVE" THE INSIDE PART OF THE CONNECTOR
8E 0972 416

7 x new wires 000 979 009 E or (14 pins)
Here is a tip - you can buy above connectors in "pig tail form" from ebay for less then one repair wire from VW.

-24 awg wire for wire extensions
I would also recommend buy black cloth tape for finishing touches.

Remove the mirror, be careful not to break it. Remove passenger door panel. 

- Set door panel aside

- Disconnect 16pin mirror connector from door module by first pulling red tap and then pressing black tap.

Once mirror is removed set it on your work bench and begin opening it up. You will notice that your current mirror motor has only 3 pin connector but new motor has 8 pin connector.

I tucked 3 pin connector inside the mirror (incase you want to go back in future) and disconnected 3 pins from 16 pin mirror harness connector.
Pins to disconnect from 16 pin connectors are: 12 , 5 and 4

Then you can run 7 new wires from 8pin mirror motor connector to 16pin mirror harness connector. Just follow the diagram and you cant get it wrong.


CODING: 

1.Go to module 46 - Convenience Module-> Long Coding Helper->Byte 14 -> check Bit 7 - check Mirror lowering with reverse gear . Ignore "only with memory seats". It will not throw any errors. It is possible that this byte/bit might be located somewhere else in the module depending on year of the car.

2. Now go to 52-Door Elec. Passenger -> Long Coding Helper -> Byte 1 -> check Bit 0 - Mirror with memory function installed

setup-

 Set mirror to desired DRIVING position
- Make sure "Mirror Down" is ON in MFD menu
- Put mirror knob to R position
- Put car in reverse and set mirror to desired REVERSE position

Mirror motor positions are now learned.

How it works
In order for mirror tilt to work it needs to be in R position. Mirror will go to reverse position when car is put in reverse gear and comes up in 2 WAYS:
1. Start driving and reach 15mph ( the same time your door locks) - I think this can be set to custom value with vagcom but I never tried. 15mph is set from factory
2. Put mirror knob to 0 or other positions. You can to this for just a brief second and set the knob back to R if you like

Passat B6 Rain sensor retrofit

Parts that you will need


 YOU MUST HAVE HIGHLINE CECM, OR ONE THAT SUPPORTS RAIN SENSOR FEATURE!!


1. 3c0 857 304 TRIM (Headliner Connector) add y20 for pearl grey, 7g8 for beige

2. 3c0 857 511 d MIRROR (auto dimming) add sma for pearl grey, tlx for beige, tly for latte
3. 3c0 857 593 a 9b9 WIRING COVER black
4. 3c0 858 547 9b9 LEFT MIRROR COVER black
5. 3c0 858 548 9b9 RIGHT MIRROR COVER black


Rain sensor number: 1k0 955 559 with suffix AF, AH, R, M. 

*** Notice***
It is likely that you will have to replace your windshield, because it can crack while you are trying to remove old glue. 

if you have no spare windshield, or you want to take a risk with your old windshield, then you have to follow steps bellow: 


Remove the original mirror mount by heating the mount with a lighter and twisting it off. Do not push or pull it, just twist it with medium force using a wrench. Any more and it will crack the glass. Use a razor and scrape and then polish all the ceramic backing paint off. Then use 1000 grit wet sandpaper to gently remove the ceramic paint. If you don't remove that dot you'll have to mount the mirror too low and there will be exposed wires. digitalextremes said it took him at least an hour to remove the paint. Then try to polish it as smooth as possible so that the glass has no noticeable scratches.

pic3

You must remove all of this old glue. So keep unitl you have result, as shown on pic3.

Use 3m fast cure urethane and primer. The urethane glass glue is 8690 and the primer is 08682. The key to making this look OEM is the 3m 08682 primer. This stuff is designed to black out in front of urethanes to protect them from the sun. Just mark a center line on the outside of the windshield with a sharpie (remove with solvent) and use the shorter of the two cable covers attached to the mount to determine the spacing to the headliner. Mark, mask, and paint. The glue is very viscous and you can pretty much just press the mount on and it will hold it until dry. 


Clean the windshield with cleaner VW# d 009 401 04  and let dry for at least 10 minutes. Apply primer VW# d 009 200 01  and let dry for at least 10 minutes and not more than 1 hour. Use 800-1200 grit sandpaper to roughen the mount until water won't bead up or run off it. Use the cleaner on the mount.

Apply the new mount (VW# 1k0-845-543) to the windshield. The slide tracks for the new mirror must face down (be on the lower half, visible in the pictures throughout this page). The new auto dimming mirror just slides up to install, down to remove. Apply a 2.5mm bead of VW's 2 part polyurethane glue (shown earlier in parts) to the mount and tape it in place. After an hour, you can remove the tape and scrape/wipe any excess off. The service manual says that you can mount the new mirror after 2.5 hours. 

If you won't use your old windshield:

Remove the overhead console. First gently pry the sunglasses holder out. There are some clips at the top holding it. The middle panel will just pop out. Remove the 2x T20 screws under it.


Next thing is to remove A pillar.


Wires will go through the a pillar but be carefull, because of airbag.


Wiring instructions for auto dimming mirror and rain light sensor


The easy way to do the wiring is to buy a premade harness on ebay. One person complained that the plug ends were at equal lengths and because the sensor and mirror are staggered, he had to unwrap and re-wrap it for fitment. Since it's only a few wires, I chose to buy some plugs, VW repair wires (part numbers are noted above) and then splice 18 or 19 gauge extension wires onto the repair wire ends to make my own harness.


Run the wiring from the rain sensor and mirror behind the headliner, down the a-pillar, tape it to the existing wiring, and down to the CECM (central electric control module) for the fusebox and ground.


Remove the 2x T20 screws holding the kick panel under the relay box. Then unplug the footwell light and separate the OBD2 port from the panel. Push the red lever on the CECM to the side to unlock the plugs. The plugs are labeled. Press the release clip on plug B and F and pull them out. You can remove a few others for access. The wiring is pretty short and the plugs are different so I don't think you could mix them up. Plug B is outlined below. You can see the red lever to the right of the relay box.


The plugs also have numbered pins. Solder in a splice on Plug F, Pin 3 (violet/blue wire as noted above, this wire also goes to the windshield wiper module) and run that wire up the A-pillar and headliner to the repair wire on pin 3 of the rain-light sensor. Cut the wiring to fit and solder them together. Splicing means that you tap into the connection and add your own wire. I chose to strip a little bit of insulation off that wire and soldered in the tap wire at that spot. Cover with electrical tape. 
Repeat for Plug B, Pin 1 (black/blue wire). This is for the backup light. It goes to pin 3 on the mirror. 

Install 2 new circuits for the rain sensor and mirror at the fusebox. See the wiring diagram above.  Repair wire VW# 000 979 225 should work but I'm not sure of the correct part number for wiring these two circuits. 

Cut the repair wire in half. Insert the terminal ends in the indicated slots. I think the mirror fuse (#7) could go on any slot on that bus. #11 should be acceptable and easier to install since it's on the near side of the fusebox, just make a note on the fusebox cover if you do that. It gets 12V when the engine is running only. I believe the bus for the RLS fuse always has 12V.


CODING :
Step1.


Step 2.


Step 3.


Step 4.


Passat B6 Side view mirros from Passat B7 retrofit

Parts that you need:
1. Tools, torx 
2. Side view mirrors form Passat B7


1. Step is to remove door card / door panel
You have have 4 screws, first thing is to pop the cover on your buttons side(that control windows and mirrros)


Other two buttons are located at the bottom. 


When you are done, just pull the door panel and it will come off. 
Disconect door handle, and conectors for windows and mirror.


First remove the speaker, just pull it of gently and it will come off. 
Now you will see 3 screws that are holding mirror fixed to its position, unscrew them, and disconect mirror plug form the door module. 


Now its time to install new mirror from B7. Everything is the same, same screws, same holes, just put everything together, plug the new harness into door module and see if it works. 
If you want puddle lights (you will need GEN3 door module), you need to code it in VCDS.

Coding for puddle lights is:

1. Find driver door
2. Go coding
3. Coding helper
4. Add +2 on your existing code (if you had 181, now write 183)
5. Click do it, and if the code is accepted, you have puddle lights working now.

Do the same thing for diver doors, just in VCDS go to Passenger door and repeat the procedure.
Same procedure is also for the passenger door panel, you have 4 screws on passenger side. Just pop up the plastic on the door handle, and you'll see 2 screws, and on the bottom you have two more. After you remove them, same procedure as was for the driver side. 

Coding for folding mirros: 

1. Find driver door
2. Go coding
3. Coding helper
4. Add +4096


Passat B6 MK5 / MK6 Multifunction steering wheel retrofit

Parts that you need:

1. Steering wheel with MULTIFUNCTION buttons 
2. Airbag for MFSW (Multifunction steering wheel)
3. Module that supports MF steering wheel

MODULE : 3C0 954 539 E


MODULE: 3C0 954 539 AJ / AH


IMPORTANT: 

There are two types of steering wheels MK5 and MK6 


MK5                                                   MK

If you want to retrofit MK5 steering wheel, you will need steering wheel module with next part number : 3C0 953 549 E 

If you want to retrofit MK6 steering wheel, you will need module with part number: 3C0 953 549 AJ or AH.

NOTICE: You can't retrofit MK6 steering wheel on older module 3C0 953 549 E. 

So lets go step by step. 

1. First thing you have to do, is to remove airbag. 


Now when you released the airbag disconect yellow plug and remove airbag. 


Now you need to unscrew one bolt, and you will be able to remove steering wheel 


IMPORTANT:  Make sure that your steering wheel was in center position, (you can easily check because there is one marking so you can match them)


Next step, remove the cover to gain acces to the steering wheel module. There are two screws, remove them to gain access. 


Beneath the Clockspring is the electronic module (with the yellow sticker on it), which the Clockspring plugs into.


On the right side of the electronic module are two black plastic clips. You need to unlatch them with a small flathead screwdriver to release the electronic module below, causing it to drop and detach from where the Clockspring is plugged into it on the front right side (where the yellow sticker is in the 2nd picture). 


Now you can remove steering wheel module gently. 


It is the same procedure with both MFSW. To put everything in the place just do the reverse from what you did when you took whole thing apart. :) 

After you are done, the only thing is to code new steering wheel comands.

Go to VCDS,

1. Find STERING WHEEL


2. Now select CODING


3. Now LONG CODING HELPER

4. Now code your MFSW, if you want mute option on PTT(push to talk button) enable bit 3. 


Now, all you have to do, is to try it. 

* IMPORTANT
If you have wiper stalk with trip computer button, you have to disable it, because it will cause confusion for you module. So, disabled it, and choose option - no board computer over wiper stalk or something like that, you'll know it when you find it. :) 

* Notice for some cars, coding can be different. It could be, that you will have numbers that you have to eneter, but that is not hard at all. If you need help, you can contact me: kimi207@hotmail.com 


Passat B6 TPMS (ABS style)

Parts that you need:

1.Button for TPMS and a few wires.
2. You can buy kit on the internet for 15-20$.
3*. ABS module that supports this type of TPMS
4. VCDS (for coding)
===================================


CODING :


How you can check if your ABS module supports :
Take your VCDS and
1. go to ABS module,
2. click CODING
3 REMEMBER the number that is already there (write it down, or take a photo)
4. That number +2048 (for example: 29000+2048).


Now you will write that new number and you will click to code it.
You have TWO ways now,
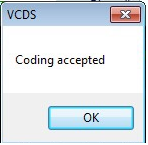
1. coding accepted and you will be able to continue and you will hear ding on your cluster.


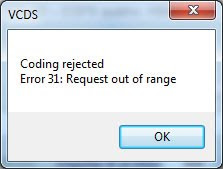
2. coding will not be accepted with messagge error (coding rejcted, request out of range).  


1. If the code is rejcted, your ABS module doesnt support this type of TPMS.
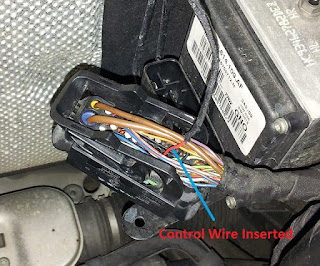
2. If the code is accepted, you will have to wire PIN 4 (red wire) wire to ABS module PIN 16. 


3. PIN 3 : illumination (tapped from an adjacent button)

4. PINS: 5 & 6 : ground (tapped from an adjacent button)

IMPORTANT:
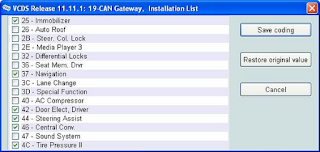
GO TO GATEWAY, coding list and enable address 4C Tire pressure II. (if you don't do this, it wont work). Also, uncheck Tire pressure monitoring (TPMS/7K6) installed. (address 65). 


After you do this step, you can press the TPMS button and hold it for 3 to 4 seconds and you will hear "ding" on your instrument cluster.

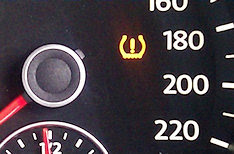
Also, TPMS icon will appear now,  when you start the car.


Your TPMS is ready for using, you can test it, deflate one tyre and drive a little bit and it will show you icon on the instrument cluster warning you for lower tire pressure.


četvrtak, 24. ožujka 2016.

Passat B6 climtatronic retrofit

I've made a  lot of retrofits on my Passat B6.
One thing that I wanted to do, was replacing old climatronic panel.
I bought new style climatronic from Passat B7.
It fits perfectly, same number of screws, only problem was I had to switch some pin wires according to new pin layout that is present on Passat B7.
You need to remove trim around climatronic (you will need new climatronic plastic trim), and unscrew 4 screws that are holding your climatronic panel.
Behind panel there are 3 connectors and they are all different so don't worry about them you can't mix them at all. :)

Then you have to relocate some pins to others wires.
On A Connector (black) extract both; Pin 16 and Pin 20 and put Pin 16 on the place were Pin 20 was, leave the wire on Pin 20 loose (not connected to the harrnes) for later connect the Air Quality Sensor if needed.
On C Connector (brown): Pin 7 connected to Pin 10 and Pin 8 connected to Pin 9
On B Connector (black): Pin 6 to Pin 7

YOU NEED TO MAKE THIS STEPS (My compressor did not work until I performed the 2 step):

First StepBasic settings: hold button AC + button straight blowing (third button from left). You will see both buttons leds blinking one after another..let them run till they come to the normal status. 

Second Step :Compresor Settings: Starting the engine and hold LONG-AC + heating rear window.Let it run till it comes to the normal status.

And you are ready to use your new climatronic panel from Passat B7 :) 

Passat B6 new cluster retrofit

I had old cluster with small display and it was ugly so I decided to change it  :) 
I found cluster that was in a good shape without scratches. Costed me about 150 euros. 
You also need adapter from China that costs 35$. (only vehicles before 2008) because your connector won't fit into new cluster. 
When you have adapter its basically just plug and play. Altough you have to code it with VCDS (real VCDS not chinese fake). Sometimes you don't have to do nothing if there are no lights (such as airbag, engine or something else). But if you want to change mileage than you have to code it. 
I've done mine, and it looks awesome.